Archives

Constructive Rest Procedure

The Constructive Rest Procedure is another name for the Lying Down Procedure, also known as Semi Supine or the Active Rest Procedure, as taught in Alexander lessons. (I wonder how many more names this procedure will be given in the future!)

The procedure is an invaluable tool to use to recharge your batteries, unwind, look after your back and to become more aware of your body use and mind-body connections.  It is practised in a semi-supine position – ideally every day, on a firm surface with some books to support the head. In this photo you can see a student lying on my Alexander table during a lesson. Generally, people use this whilst lying on the floor when practicing at home or at work, rather than on a soft surface like a bed which does not give enough support.

Further details about how to use this are to be found in my notes on using the Lying Down Procedure but you really need to learn this from an AT teacher first, so that you understand how best to use it.


Alexander Technique Constructive Rest Procedure (the Semi-Supine Position)

Pupil using the Constructive Rest Procedure during an Alexander lesson

A Deeper Look at the Lying Down Procedure

Alexander Technique Lying Down Procedure

Also known as:

Semi-Supine; Active Rest; Constructive Rest Procedure; ‘Inhibition Work’.

When F M Alexander was running his training school, there was no table available, so the lying down procedure took place on the floor and that is how we practise it at home.  These days, teachers use a table during lessons. According to Elisabeth Walker who trained with him, Alexander used to call the lying down procedure ‘inhibition work‘ (Forward and Away ~ Elisabeth Walker 2008).  This illustrates the fact that our thinking is all-important during this procedure, in order to stop any reactions of tightening that occur whilst we are lying down.

You are doing what you call “leaving yourself alone’
F M Alexander Aphorisms Mouritz 2000

Semi Supine

Lying Down in Semi-Supine


Do this procedure on the floor but not the bed as it is too soft and will not give you enough support in the right places. If you are physically unable to get up and down from the floor, then by all means use the bed.  Place the number of books that your teacher suggested you need,  under your head, so that your neck and spine are able to lengthen out freely without arching.

To start with, choose a warm, quiet room to lie down in. Over time you want to be able to work on yourself in many different places, such as up the garden.  Learn to train your thinking and allow yourself to return to a quiet, expansive state – a good stress management skill to develop!

Twenty Minutes a Day – Unless you are over 28 Weeks Pregnant

Give your body time to unwind and decompress. You need to give this process about 20 minutes. If this is really difficult for you, then start off with at least 10 minutes and try to extend the period you lie down.

However, if you are over 28 weeks pregnant, the NHS advises that lying on your back can put pressure on the baby so should be avoided. You can use all the same thinking whilst lying on your side and you can use procedures will Wall Work to help ease your back.

The Act of Lying Down

First of all stop, say ‘no’ and inhibit your usual way of going to lie down. Think about how you are going to move and keep using inhibition all the way through the procedure.

With awareness, give yourself directions and begin to lie down on your back with your knees bent, moving into the semi-supine position, as above. Take care not to arch your neck back and down onto your books, but remind yourself to direct your head forward and up so that you gently maintain the spine’s length as you move.

Check that you have a free neck. Then think about how you will bend your knees but inhibit any tightening and distorting that interferes with the movement, then freely bend your knees out and away from your hip joints. Place your feet on the floor as wide apart as your hips are so that your hips, knees and feet are in line with each other. Take care to align your feet so that they do not turn in, nor out further than your knees.

However, remember that how you are, is much more important than your exact position. Do not lock and fix yourself so that you can hold the ‘right’ position and say ‘no’ to any impulse you have to wriggle around and re-adjust your position.

‘There is no such thing as a right position, but there is such a thing as a right direction’
F M Alexander – Aphorisms – Mouritz 2000

Continue to give yourself directions and place your hands on your ribcage, with your elbows directing out and away from each other.

Allow your back to drop down to the floor and to gently lengthen out. Do not force anything but allow the changes to take place as you give yourself directions.

Thinking and Directing

Now you can begin to practice the thinking skills developed in the Alexander Technique. Allow your mind and body to quieten but remain alert with your eyes open; direct yourself to release contracted muscles so that they can lengthen out again and inhibit any urge to move around or tighten up again.

  • Allow my neck to be free
  • Allow my head ease to forward and up
  • Allow my back to lengthen and widen
  • Allow my knees to ease out and away

As you continue to give yourself directions, you will bring about changes in your habits and use which you aim to continue throughout everyday activities. You are not actively doing anything; it is all ‘mind over matter’. You need an alert mind, not switched off or sleepy, but ‘working on yourself’. In this way you gain a deeper understanding and subtle, conscious control over your use and your thinking. Remain aware of the outside world, whilst developing inner awareness and giving yourself directions.

Allow your body to ease in the directions of the arrows


When your mind wanders, come back to being aware of what is going on in your body. It can help to recognize the links between your thoughts, feelings and bodily reactions. Perhaps you have started tightening up again in response to something you thought about? If so, when you recognise your reaction patterns, let go of those habits and connect with places of ease in yourself.  Avoid wriggling around but lie still, easy and alert. Allow yourself to return to a quiet, neutral state so your body eases into its full length and width. Your mind and nervous system will quieten and you will breathe more freely.

Give yourself directions and allow yourself to experience being – just as you are.

Getting up from the floor

Please get up from the floor thoughtfully and slowly, so that you can avoid light-headeness and dizziness that can occur with postural hypotension.

When you wish to get up again, maintain any quietness, release and lengthening that you have experienced and take these with you into your movements. Say ‘no’ to any habits of mis-use that may start to reappear as you begin to become active again, then continue your directions and move freely and expansively as you get up from the floor.

Look over into the direction you wish to move and allow your head to follow your eyes, then bring your arm over your body to that side of you. Gently begin to roll over, with your hips knees and shoulders moving together, so that you avoid twisting your torso.

Roll onto your side and continue to roll over, keeping your knees bent, so that you end up on all fours (in a crawling position) with your back lengthened and your head in alignment with the rest of your spine.

Giving yourself directions to have a free neck and maintaining the length in your spine whilst moving, quietly bring yourself into a kneeling position.

Continue to give directions and say ‘no’ to standing up without thought. Move into a high kneel then allow your head to lead you into movement as you rise to stand on two feet.

  • Remember: Stop and Inhibit ~ Think and Direct ~ Then Move

Still unsure about some aspects of the procedure?  

Alexander Technique Lying Down Procedure: FAQ

You can see a video produced by STAT, talking you through the Lying Down Procedure:

https://www.youtube.com/watch?time_continue=21&v=NhxMNou1Tfo

As a new pupil put it in an email to me – ‘I’ve had a very stressful day so I’m going to do some lying down! It really does help to ease the tension’

Notes on using the Whispered ‘Ah’ Procedure

The Whispered ‘Ah’ Procedure

This requires some understanding of the Alexander Technique, in order to be able to perform the whispered Ah procedure in a manner that will be beneficial. It is best not to try the Whispered Ah Procedure on your own but wait until you have learnt it with your Alexander Teacher, who will guide you through. It is important that you have the skills to inhibit tension patterns and mis-use, whilst you keep giving yourself directions throughout the procedure, so that you keep free and avoid contracting your neck, throat and vocal mechanisms.

When you practise the Alexander Technique whispered Ah procedure, it can help you improve your breathing, calm you and help strengthen your voice – even though you do not vocalise during the procedure. Many singers and vocalists use the whispered Ah on a regular basis, because they find it to be a valuable tool that helps them look after their voices. Childbirth is another time when using the whispered Ah can be very helpful.

Child yawning with a lovely free jaw and face,  Photo VasanthRaj

This child is so natural and easy. See if you can perform the whispered ah with a similar ease…

Do you swallow your feelings?

If you are angry, or are someone that tends to swallow your feelings, bite back your words, clench, or grind your teeth, this procedure will be invaluable to you. Or maybe you have a stiff upper lip or ‘grit  your teeth and get on with it’  This procedure is a great way to become aware of those habits.  It can also help us learn how to let go of habitual tension patterns. Some people wear down their teeth through grinding them.  Others are given a brace to wear at night by their dentist, in order to reduce discomfort caused by habitual jaw tension and grinding teeth. How much more pleasant it could be to use the whispered ‘Ah’ instead of filling your mouth with hardware!

Relaxation Response

As part of the calming process that can take place, you may notice an increase in saliva production in the mouth, indicating a reduction in tension plus the activation of the parasympathetic nervous system (PNS), both being signs of what has been called the ‘relaxation response’ by psychologists. You might also start yawning as you free up!

The whispered ‘Ah’ can be practised in many different positions, lying down, standing, sitting, in monkey position, or with arms on the back of a chair, for instance. Perhaps the easiest way to start, is to try whilst lying in semi-supine. This can be a helpful position to use initially, as you will get feedback from the floor or AT table, about your body use. so that you can notice more easily if you tighten and pull your head back and down, which you will notice as an increased pressure on your head. However you may find the procedure is more effective when you are ready to try it in an upright position.

Using a monkey position, or having your arms on the back of a chair in front of you, are particularly useful positions to assume whilst practising the whispered Ah as they enable a greater expansion and freedom in the ribcage, thus allowing deeper breathing to take place.

The Whispered ‘Ah’ Procedure

  • Pause

Say ‘no’ to any urge to perform the whispered Ah before you have given yourself directions to free your neck, allow your head to go forward and up and allow your back to lengthen and widen. Alexander is reputed to have asked pupils to give directions ‘one at a time and altogether‘ throughout any procedure.

  • Smile

Ideally,  think of something amusing so that you smile or laugh in a natural manner. This frees the facial muscles and diaphragm, plus lifts the soft palette in the mouth. A forced smile will tend to tighten facial and neck muscles, not free them.

  • Let your tongue ease

Next, let the tongue drop down behind the front teeth, allowing it to become softer. Let it ease in your mouth and right down into your throat.

  • Pause

Then, inhibit the urge to move without thought, give yourself directions and take care not to contract the head back and down, as you free the jaw and allow it to open in a slightly forwards direction. Do not force the jaw forwards but equally, take care to inhibit any tendency to pull it open by contracting the jaw down and in towards your throat.

  • Allow your jaw to drop and ease open. Breathe out with a whispered ‘Ah’

As your jaw freely opens, whisper an Ah sound on the outward breath, allowing your lungs to empty as you do so. Inhibit and take care not to contract down or force the air out but keep reminding yourself to have a free neck, tongue and throat, whilst you allow your body to lengthen and widen. It may help to remember that as the air is expelled, it flows upwards through your body, towards the roof of your mouth.

  • Gently shut your mouth

Close your mouth without tightening your jaw. Inhibit any urge to force an intake of air or interfere with the natural process of inhaling – just allow your breath to enter through your nose and let it fill your lungs.

Avoid repeating the procedure mindlessly!

Once you have completed the procedure, you can practise it again. However, take care not to get into end-gaining by repeating the procedure over and over again, whilst losing awareness and forgetting to give yourself directions. One whispered Ah performed freely is worth far more to you than performing it six times with less and less awareness, so that mis-use creeps back in. Make sure your Alexander Teacher helps you with this.

Read about the Whispered ‘Ah’

There are some excellent explanations and discussions of the Whispered Ah procedure to be found in various books, particularly the whole chapter devoted to the topic in:

Indirect Procedures: A Musician’s Guide to the Alexander Technique ~ Pedro de Alcantara ~ p144


Lying Down Procedure: FAQ

The Constructive Rest Procedure

What do you need to know about practising the Lying Down Procedure?

  • It’s hard to find time – how long do I have to lie down for?

Ideally, you need about 20 minutes a day for the procedure, or a minimum of 10 minutes, as your body takes this sort of time to become unwind enough for changes to take place.  This is particularly true when you are learning the procedure and developing your thinking skills. If you lie down more than once a day, subsequent sessions could be shorter. Some people find it helpful to use a timer or alarm, so that they don’t have to worry about when to stop.

The Active Rest Procedure offers you the quickest and easiest way to begin learning about the Alexander Technique and about your own body. You will get the most out of the money you pay for your lessons, if you work on yourself regularly!

Sometimes there will inevitably be occasions when we really do not have time or space to practise the lying down procedure. However, if you find this is a constant problem for you, ask yourself, why are you are living in such a hectic and probably stressful manner? Is it really the case that you can’t give yourself 10-20 minutes a day to look after yourself?

Perhaps you find you are resistant to doing the practise? This can happen for a variety of reasons: sometimes we can feel rebellious and do not want to let ourselves change; sometimes we can be afraid of thoughts and feelings that can surface when we let ourselves be quiet; or it can just seem uncomfortable to learn about ourselves. It may help you to talk to your teacher about some of these issues if you find they apply to you.

Just do it on a regular basis and you’ll find positive changes start happening in yourself.
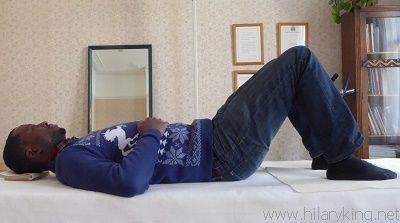
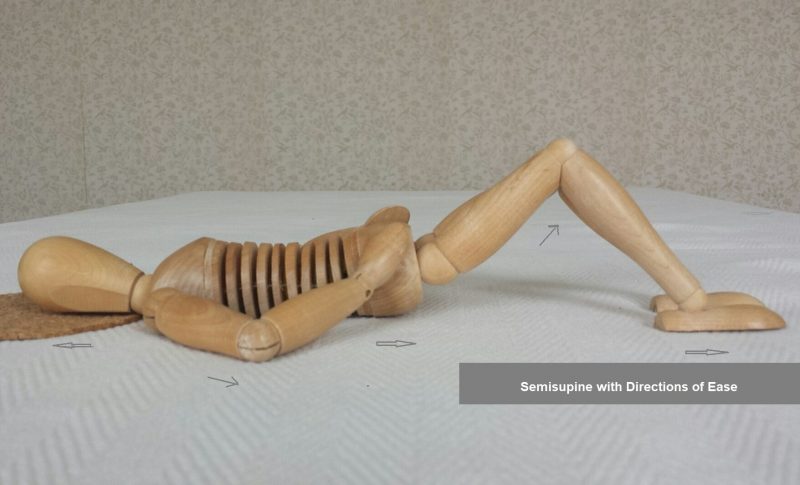
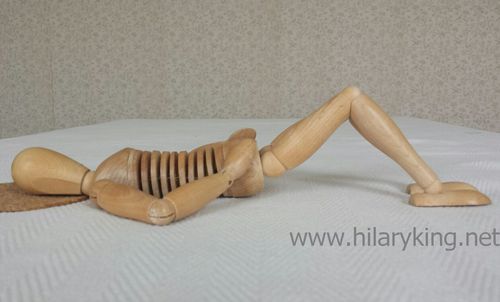
Semisupine model


  • Can I lie down in semisupine when pregnant?

This is fine during early pregnancy. However, after 28 weeks it is best to only lie on your back for brief periods. Research suggests that the weight of the mother’s organs can put pressure the baby in this position.  You can use all the same AT thinking whilst lying on your side as you would in semisupine. Also, in order to look after your back, you can practice using some wall work.

  • Can I lie down on my bed to practise?

Ideally, no. The reason for this is that unless you have an exceptionally hard bed, the mattress will give way and won’t support your back, which will tend to become more curved, because the weight of your legs will push down into the bed as you lie in semi-supine. Your back, therefore, will be unable to lengthen and widen freely and your muscles find it harder to release tension.

Also, there may be more of a temptation to drift off into sleep, rather than to work on yourself with an alert mind, with awareness.

Of course, if you have mobility problems, or are experiencing a long period of illness, working on yourself whilst lying in bed can be extremely useful and can aid recovery. Remember, though, that if you can lie on the floor as well as the bed, the more effective the work will be.

  • I can’t remember what to think about when I practise

To begin with, just keep reminding yourself to have a free neck, inhibit any urge to move around and just do less. Become aware of what is going on in your body, mind and feelings and see if you can learn about how they relate to each other.

Over time, as you become more familiar with the procedure and the Technique, you want to give yourself directions and train your thinking to bring about changes in yourself whilst lying in semi-supine. See my article on the Lying Down Procedure for further information.

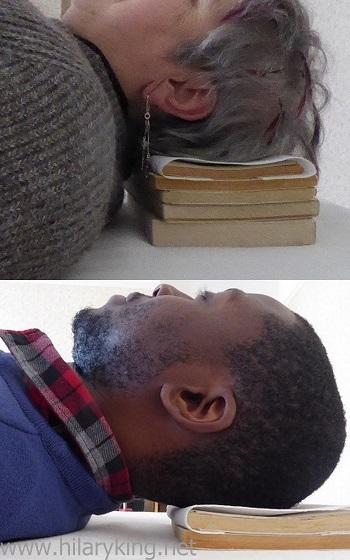
  • My friend uses a different amount of books to me, why?

We each need the amount of books that will allow our necks to release and lengthen when the head is resting on them. This release needs to take place equally, through both the back and the front of the neck. If the books are too high, the chin will be pushed in towards the neck and possibly restrict the throat. If the head is thrust too far forwards, this can also put pressure on vertebrae at the base of the neck.

Conversely, if the books are too low, the head will fall back and down onto the books, with the neck contracted and arched like a banana. In this position it will be less possible to let go of tension, free your muscles sand allow them to lengthen out again.

AT books different heights

The height of books depends on each person’s head-neck-back relationship

Therefore the number of books used will vary depending on the shape of our bodies, so a child may not need any books, whilst some adults may need several.

Importantly, check the height of books that your teacher uses with you and make sure you have the same amount ready and waiting for you, where you practise the lying down procedure. It is easy to measure the height against your finger, so you know what to use next time.

  • The books hurt my head – what can I do about this?

Use paperback books, they are a bit softer than hardbacks. A cushion is too soft – it will give way, rather than your muscles letting go and giving way.

When you move to lie down, say ‘no’ to arching your neck as you put your head on the books. If we contract whilst lying down, we press down onto the books and make them seem harder. Instead, pause, give yourself directions to free your neck and allow your head to ease out and away from the top of the spine, as you place your head onto the books.  Remember that the ‘up’ direction refers to a flow of energy up your spine (not to the ceiling).

Continue to give yourself directions whilst lying still and say ‘no’ to tightening your neck so you avoid arching and shortening.  As you allow more ease, you will probably notice a reduction in the perceived hardness of the books.

If you continue to have problems, try putting a mouse mat or towel on top of the books. This is often soft enough to take the edge off the hardness.

  • The floor hurts my elbows

Before you try putting something softer under your elbows, check that you are not holding your arms and shoulders in a way that pushes your elbows onto the floor. Keep doing less, free your arms and allow them to ease out and away from your ribs and spine.

If the surface you are lying on is very hard, you could try placing a mouse mat or small towel under each elbow.

  • I’m travelling but books are heavy – what can I do?

Weight is a problem for holiday makers, musicians and people who travel for work.

A thin yoga mat can be helpful if you have stone or wood floors. You may like to take something as a pad for your elbows as well, as these mats are usually narrow.

Instead of books, you can cut up a gardening kneeling pad and keep it with your musical instruments or suitcase. These pads are light, cheap very portable yet dense enough to support your head. If you are concerned about the environment, there are environmentally friendly versions that you can buy.

Keeping your head rest pad with your equipment can also act as a visible reminder to lie down – particularly useful when life gets hectic!

  • I find it hard to free my legs because my feet keep slipping

Check the position of your feet on the floor. If you have placed them too far away from your body, they will tend to slip away. Also the weight of your legs may drag on your pelvis, possibly making your lower back arch. So, inhibit any urge to move without thought, then give yourself directions and bring one foot at a time closer in towards you. You want your heels to be more or less under your knees and your feet in alignment with them.  Free your legs and allow them to ease up and away from your pelvis. Remind your feet not to grip the floor.

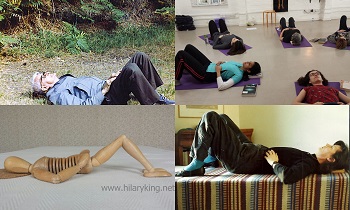
If your feet still tend to slip away, try wearing socks with non-slip soles. These are also cosy in cold weather, as you don’t want to get chilled whilst lying down. You can also try using a piece of mesh matting that is designed to go under carpets to stop them slipping. I use this on my Alexander teaching table – as you can see in the photo below.

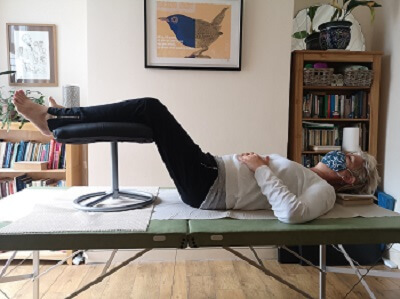
  • How do I stop my knees falling outwards?

You can use a blanket over your knees. This will not stop your legs moving but will help stabilise them. You could also ease your heels outwards a little. This helps free up the muscles down the outside of your leg and reduce the outward pull.

If you put your legs up on a chair, as in the photo, this allows you to work on yourself without worrying about knees falling outwards.

Try putting your feet up on a chair

You can also lie with your legs supported on a chair for a change. This is useful if your legs or lower back are feeling sore, or legs tend to flop about as they release tension. Some people find it easier to free up the legs in this position.

  • Can I listen to music whilst lying down?

If you are just learning how to do the lying down procedure, it is best not to let yourself be distracted by something like music. You want to train your thinking and work on yourself during the procedure.  Music or TV will take your mind away from your practise, maybe even encourage you to drift off into sleep. Then you will not develop AT skills and awareness, nor have this incredibly useful tool under your belt, so that you can use it to help look after yourself.

As you get more experienced at working on yourself, the aim is for you to be able to use your AT skills, whatever you are doing. So listening to music sometimes should not be a distraction but you will be able to listen and work on yourself at the same time. However, you will work on yourself better, if you give yourself undivided attention during the Active Rest procedure.

  • When is the best time of day to practise the lying down procedure?

The time that works best for you and your lifestyle is best. To begin with, many people find it helps them remember to practise, if they lie down at the same time each day and make it part of their routine. As you get more used to including the procedure into your life, you will probably find that the times you use will vary, according to your needs.

Some times you can consider

  • First thing in the morning – allows you to start the day from a neutral place in yourself, set yourself up for the day and will encourage good use throughout your activities.
  • Lunchtime – you can free yourself of tensions that have built up in the morning, restore your energy and prepare yourself for the afternoon.
  • After work – allows you to let go of work and the tensions that built up during the day. It can also act as a period of transition between work and your private life, plus help you to approach the evening from a free place in yourself.
  • Before bed – this is a good time to practise the lying down procedure, if you tend not to sleep well. As you work on yourself, you will allow your body to go into sleep freely, without dragging so much ‘stuff’ into sleep with you. However, it is all too easy just to fall asleep on the floor, in which case you will not have done much work on yourself and will have to wake yourself up in order to get into bed – rather counter-productive. If this tends to happen to you then it’s best to try the procedure at other times of day.

The main thing is to practise the lying down procedure every day. Just do it!

MORE QUERIES? Ask me at your next lesson.  You are also welcome to email me or use the Contact Form to ask me any further questions you may have.

Notes on Using Wall Work

Wall Work

Wall work is a procedure you can begin to use quite early on in learning the Alexander Technique. Providing you practise this with awareness and resist the temptation just to turn it into an exercise.  You can use it to learn a lot about your body Use whilst making a movement. It can also help you reduce tension and ease backpain. The procedure seems very simple but it is easy to let mis-use and distortion to creep in. So it is important to try this with your Alexander teacher, before exploring it on your own.

Teen exploring wallwork

Hilary working with a pupil doing Wall work

Using the wall allows you to have feedback about where and how your body is touching the surface. We can learn from this feedback. Does your back change as you move? Do you pull yourself off the wall, or twist, or push your back into the wall?

Want to use the Lying Down Procedure but can’t because of where you are?  Try using wall work at work, or waiting at a bus stop for instance.  (Don’t look like Baloo scratching his back against a tree!  Just quietly lean against the surface and free up your back!)

Wall work is Useful During Pregnancy!

If you are over 28 weeks pregnant, the NHS advises you not to lie on your back, in order to protect the baby. So using the Lying Down Procedure is less advisable for anything but brief periods. However, wall work can offer many of the same outcomes and is safer to use.

I have worked with pupils during pregnancy and using wall work is extremely helpful in the later weeks. It can also help the mother to explore going down into a squat, which is very useful during childbirth.

Marjory Barlow, F M Alexander’s niece and first generation teacher stated:

“FM had people working against the wall in the first training course. He used to say that the wall serves the same purpose as the table – an objective criterion, only in the vertical.”

Avoid End-gaining!

This is not about seeing how many times you can go up and down the wall. Neither is it about how far you can bend or slide down into a squat. Wall work is used to help you notice which unhelpful habits come into play during movement . When you learn about HOW you habitually tend to move, the more choice you have about how you perform activities.

The Wall Work Procedure

You need a smooth, flat surface such as a wall, door or even a bus stop to lean your body against. As you practise the procedure, use the feedback you get from the wall to learn about what is going on in your body as you move. Do you notice twisting or arching, do you pull yourself off the wall, or push yourself back onto it for instance? What do you notice? Do not push your back against the wall.  Allow it to gently ease and be supported by the wall.

Remember to pause and inhibit at the start; say ‘no’ to rushing or forcing your movements; to falling into the trap of end-gaining and doing lots of deep bends without awareness;  say ‘no’ to any habits of mis-use that you are aware of, or to any new ones that you discover whilst doing during the procedure.

Give yourself directions throughout all your movements during the procedure.

Place your feet as wide apart as your hips, with heels about 3″ from the wall

Your head is unlikely to touch the wall (although your hair might touch it). If it does, this suggests that you may be pulling your head back or retracting your chin stiffly. Free your neck and allow your head to ease forward and up, so the distance from the wall is about the same as the height of books you use for the Lying Down procedure.

While standing, allow your weight to be taken by the wall and become aware of which parts of your back are touching the wall. Usually, you will have your pelvis and shoulders touching the wall, with a small gap between the wall and your lower back. However, sometimes this arch is exaggerated because lumbar muscles are contracted and shortened. Get to know your own body and habits. Notice how much of your back you are allowing to release towards the wall and how much you are holding away from the wall.

What does this tell you?

Have you tightened your neck? Is one side of your body pulling away from the wall in a twist? Is your lumbar region arched and the muscles tight? Can you feel easy movements in your ribs when you breathe? Or are you fixing your ribs so they barely move?

If you notice any twists, arches etc in your back, resist the temptation just to ‘fix’ it and ‘do‘ the change by pushing your back into a new position. Use the directions to free your neck and your back, gently letting go of any tensions that pull you off an even balance. Allowing a tiny change that you can maintain freely, is of more value than just pushing yourself into a new position – that will probably revert back to the old one, as soon as your attention moves elsewhere.

  • When ready to bend your knees, pause, then move freely whilst giving directions.    Let your knees release out and away from your hips and your back, which stays easing back towards the wall.  Consciously control your movement, so that you slide a little way down the wall. Maintain a free neck, free your hips, knees and ankles. Allow your pelvis to move  so that your coccyx drops downwards as your lower back releases.  Your lumbar arch can begin to lengthen out to become more shallow or even disappear – as it does when you lie down in semi-supine.
  • Do not bend your knees too far to begin with. Only go down to where your thighs are parallel to the floor. As you move, keep allowing your head to direct forward and up, so that you maintain an upward flow through your body even though you are sliding down the wall.

Pause briefly with your knees bent and keep giving yourself directions. Refuse to tighten anywhere in order to hold the position. Allow yourself to breathe freely

What do you notice?

Is your back free and lengthened or did you pull yourself into an arch or twist as you moved? Are your knees directing out and away from your hips with muscles lengthening over your toes?  Or did you contract in towards yourself, making the bent-knee position uncomfortable to maintain for any length of time?

Unless you are just recovering from an illness or injury, you would be well to note Dr Barlow’s words in his useful description of using wall work If you find this position tiring after quite a short time, then you are indeed in a mis-used state’ ~ The Alexander Principle – Wilfred Barlow – p 117.

  • Before you straighten your legs again, inhibit, think and give yourself directions. Take care not to push yourself upwards with your legs or pull your head back and over-arch your torso as you move.
  • Keep reminding yourself to have a free neck and allow your head to lead you into the upward movement with ease, your legs following your head. Think your back back towards the wall – don’t just push it back as ‘doing’ will just curl your spine and contract your abdomen. Ease your heels towards the floor. Allow your back to keep freely lengthening.

What is your back like now?

As you straighten your legs a slight arch will return to your spine but your back can keep being free and more lengthened than before – but did you tighten and over-arch, pulling your back or pelvis away from the wall? Many people do so and this is one habit of mis-use that you can learn to let go of with this procedure.

The more you can notice about your tensions, distortions or lack of inhibition, the more information you have for when you explore the procedure another time. Keep inhibiting, keep directing, keep freeing yourself throughout the movements, both going down and up. It will gradually feel easier to do and you will be able to avoid pulling your body around as you move.

  • Remember: Pause and Inhibit ~ Think and Direct ~ Then Move